Wednesday, June 22, 2011

Dreams are Free

Well, I'm back!!  I have several more posts upcoming about how exactly I spent my $75 in April & May, but for now I'm just celebrating that I finally cracked the login to sign back into my blog.  Yay, me!!  ( I will be writing that down so I don't get locked out ever again.)  Anyhoo...we've been hard at work here at the HevelHouse & have some big changes coming, I can't wait to share them.  

In the meantime, I will update you on our plans for our little "Project."  I'm always thinking of new ways we could decorate our home and LOVE doing mood boards.  It's like shopping without spending a penny, and it's so much fun to see how many different ways I can decorate one room.  It drives Shawn a little crazy sometimes.  He's always seeing dollar signs racking up, but I just remind him, "Dreams are free!"  The other day, I was looking at our living room mood board and thinking it was getting a little LOUD with all the bright colors.

LIVING ROOM BEFORE
1. Green Jute Roman Shade, World Market  2. DIY Starburst Mirror  3.  Paint: Sagey/Jogging Path/Yarrow, Sherwin Williams  4.  Waterfall Acrylic Table, ebay  5. Thom Filicia "Fabia" in Spa, Calico Corners  6.  Pier One pillow  7. Arabesque Rug, World Market  8. Teal painted piano, DIY  9. "Three Machines" Poster, Wayne Theibaud  10.  Manstad Sleeper Sofa, IKEA  11.  DIY Tripod Surveyer's lamp

I love color, but our apartment isn't very big and despite the open floor plan I just don't think I could live long term with so many "in your face" color choices.  So back to the (virtual) drawing board I went.  In the original plan, I designed the room around a print we purchased in San Francisco from one of my favorite artists.  It was Wayne Thiebaud's "Three Machines."  I just loved the way the paint seemed to change colors and how vivid it was on the canvas, but filling my entire house with those colors was like a sugar overload!

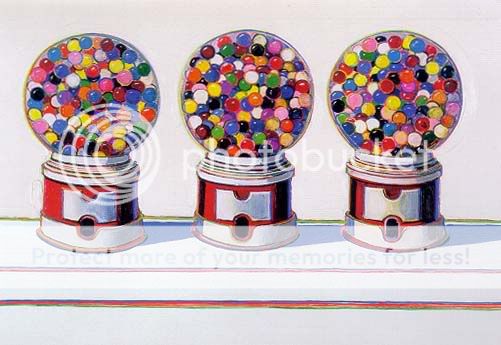
Wayne Thiebaud's, Three Machines


I was aiming for "fun & funky", but searching for fabrics & accessories to match the poster print made it seem more like "loud & crazy."    The colors in the Thiebaud print were very limiting, and everything I found looked like it had just come out of a child's toy box!  See what I mean?...

Ralph Lauren, Carolina Paisley via JoAnn Fabric

I quickly decided that my beloved Thiebaud print would have to go.  So for the living room re-design I picked our current living room/dining/kitchen paint colors as a starting point.  I knew I wanted something that was similar to my original design, but with a more sophisticated, grown-up feel.  Without the pressure of having to match-up my fabric to anything, I could pick something that I loved (something that I could live with for more than just the 30 seconds it takes to hang them up) and then choose accessories that would compliment the fabric.  I finally settled on this print:

Waverly, Wonderama (Toucan)


I loved the movement of the pattern and how playful it was while still seeming to stay sophisticated.  Once I decided on the anchor fabric, the rest of the process moved a little faster.  I hit up my favorite spots for pillows, accessories, and furniture and LOVED how it all turned out!

LIVING ROOM AFTER
1. Green Jute Roman Shade, World Market  2. DIY Starburst Mirror  3. Waverly "Wonderama", Fabric.com & Diamante "Seamist", Calico Corners  4.  DIY Tripod Surveyer's Lamp  5. Acrylic Waterfall Coffee Table, eBay  6. Flokati Wool Rug, World Market  7.  CB2 Pillows (discontinued)  8. Manstad Sleeper Sofa, IKEA  9. DIY Painted Piano  10. Mug Shot Pet Portrait, Manda's Art Studio  11.  Paint: Jogging Path/Sagey/Yarrow, Sherwin Williams


I learned two lessons through this process:
  1. If it's not working, change it - Don't get too hung up on any one piece.  I love my poster print, but it just wasn't working for me.  If something you love isn't working for your design plan, give yourself permission to get rid of it.  
  2. Start with the fabric - It's always easier, when designing a room, to start with a fabric you love; then pick the paint and accessories to match. 
So what do you think?  Have you had any recent "design disasters"?  Do you make a Mood Board before you start decorating?  I'd love to hear from you!


Monday, April 11, 2011

Best Laid Plans

What I planned to do this weekend was take "before" photos of my whole house to give you a better idea of what I'm working with, but then Shawn & I got called away to do this....


A bathroom rescue for a client; complete with scraping, sanding, spackling, & sealing.  What was supposed to be a simple, "I'll just throw a fresh coat of paint on the walls before my daughter's Birthday party" turned into an S.O.S. of epic proportions (nothing like the sight of blistering, peeling paint to send you running for the professionals).  So instead,  I will leave you with a very simple Before & After.

When we first moved into our apartment I decided it was best to wait before I hung any artwork on the wall.  I wanted to get a feel of the space and dreaded the idea of turning my walls into Swiss cheese from moving pictures around.  That brings us to today's "before".  There is this tiny little wall in the kitchen that I felt has been begging for SOMETHING, but what?  I wanted to  find a super cool vintage frame and fill it with cork to make a family message station, kind of like this:

House and Home


The reality is, I have absolutely NO time to take on yet another project (and should probably focus on finishing the ones I already started) so the wall has looked more like this for the past year:


Such a waste of space!!  While helping the hubby organize the garage I rediscovered my boxed-up paintings and pictures.  I had almost forgotten that I had all those wonderful treasures hiding right under my nose.  One of the paintings incorporated all the colors from my kitchen & dining room and would tie the two rooms together nicely while filling the space out perfectly!  I had purchased this piece from a local artist when we lived at our last house and never could find "the perfect place" for it, so I carefully boxed it up until I could find one.  The artist called it "Affluence", but something about it made the man look so sad to me.


I love how he's dressed well but is missing his shoes, like it was all a facade of wealth.  It brings to mind the phrase, "keeping up appearances."  Anyways, I digress. *ahem*  So I dragged it out from the garage and put the hubby to work (he's very handy like that).  Perfection!!


It's amazing to me how such a small change can make a big impact.  On a larger wall, this painting would have gotten lost, but the scale fits perfectly and allows the painting to command attention.  Best of all?  This makeover was F-R-E-E (quite possibly one of my favorite words)!!  Maybe you have something hiding away in your attic/garage that can breath new life into a neglected space in your house.

Side Note:
I'm a big fan of supporting local artists.  "Affluence" was painted by a young artist name Leroy Shaw who is a self-taught artist.  I especially like his more expressionist works.  You can check out some of his work on his MySpace page, or if you are in Columbia you can catch him at the Barnyard.

Self-Portrait, Leroy Shaw


Tuesday, April 5, 2011

Love at First Sight

You know that moment you see something and your heart stops?  You know, when you realize you're actually holding your breath?  Well I was just cruising along eBay one day and it happened, I saw this beauty:


I was totally smitten.  Then I looked at the price, ouch!!  For about two weeks I tried to shake it off but I was officially obsessed.   I mean, just LOOK at it...


I knew that it would be perfect for my dresser.  I could see it holding my keys and other small accessories and bring a little bit of the green from the rest of the house into the bedroom.  I've always been more than a little obsessed with the details.  I think they are like the jewelry to a room.  The right accessories can can take a room from drab to fab, they make the eyes linger and beg you to stay just a little longer.  I've also learned that when you've fallen head over heels in love with something, you always wish you hadn't walked away.   So, even though it was more than I would normally spend on a small accessory item, I decided that I would go for it.  Now I am *ahem* patiently waiting for the arrival of my "it" piece, stalking myEbay and tracking it's every move.  Until then, I leave you with a breakdown of today's cost:


Monday, April 4, 2011

What I've Learned from the Blogosphere

For the past 8 years I've struggled to balance my desire for a "magazine" house and my duties as a stay-at-home Mommy.  With only one income I decided that I would have to give-up on the idea of having a "design plan" for my house and "make do" with what I had.  While I was thankful for a place to put my bottom and rest my head, I still struggled with feelings of discontent.  I longed for the days when I could buy what I wanted and make my house look like the pages of Pottery Barn.

When my husband and I got married, we decided that it would be best for me to quit working and  stay home with our young son.  The budget I had to work on decorating was now non-existent.  I long ago resigned myself to the fact that it would probably be years before I was ever again able to make my home into something beautiful.  Then I found Young House Love, Sherri & John taught me that I didn't need a million bucks to make my house look like a million bucks.  I was inspired to transform my house into a home, and I wanted to do it in one year on a budget of about $75 per month.  With lessons learned from the blogosphere of home improvement DIYers, this is how I plan to do it:

  1. Rome wasn't built in a day - While the homes on the internet look stunning, they are almost always a lesson in patience.  Most bloggers have been steadily chipping away at decorating their homes over a process of several years.  I'm usually an all or nothing person, so if I didn't have the money to "completely" transform a room I would give up.  The internet taught me that even if I have to take 10 steps to get it done, it's better than not even starting.
  2. You need a plan - Most all home decorating bloggers started with a plan.  Some of them made mood boards, and others just had pictures from magazines that inspired them.  My Dad always used to say, "If you don't know where your going, you'll never get there."  It's kind of like that with my house too.  Start with a "big picture" idea and then look for specific pieces that can make that dream a reality.
  3. Mistakes are bound to happen - I used to feel like I must have done something terribly wrong when my design ideas went awry.  Thanks to the wonderful bloggers willing to embarrass expose themselves to the world, I've learned that I'm definitely not alone.  

Armed with my new-found knowledge, I birthed the Hevel House Project: the complete transformation of my house from shab to chic in one year on a meager budget of $75 per month.  You are invited to follow along and watch as we attempt the impossible achieve our goals.  I will show you the exciting before & afters and do a budget breakdown, so you can be inspired too!