

Saturday, October 26, 2013
Consolodating
Unbelievably, I'm continuing to get insane amounts of traffic to this blog. Over 2000 blog views kind of traffic. I have woefully ignored this blog. Mostly because I gave up on the "project" idea of this blog, but also because we have spent more of our focus on the bigger picture of our goals. Because of that, this blog (focusing on the small projects) seemed less important. I'm super appreciative of the interest in this blog, but my heart just isn't in it anymore. We have always wanted to start our own self-sufficient farm and teach others to do the same. So, I'm inviting you to join us over at our other blog heavenlyacreshomestead.com. You can follow us as we build our farm from the ground up. I promise there will be some home decor/project posts along the way, but for the most part it's all about the land and the dream. Thank you for showing me so much love over here, and I look forward to seeing you over at the homestead.

Monday, October 29, 2012
Ch-ch-ch-ch-changes
Most of you probably already know by now, but...WE ARE MOVING!!! For many years we have known that we would eventually move to Chattanooga, TN; although, we thought that move was still several years away. Well, after visiting the "Noog" (as the locals like to say) in August, we decided to "check things out" and "prepare" for a move in another year. Shawn thought he should at least take a peek and see if there were any job opportunities, and boy was he surprised. Apparently, Chattanooga is trying to make itself into the new Silicon Valley; so there is an abundance of jobs in the computer field. Well, he figured it didn't hurt to apply for jobs....and before we knew it he was being offered several; and we were looking at moving our family in three months instead of the year we had previously planned! God is good, and he has moved mountains to make this move possible. I am simply amazed at His goodness.
My conclusion: $75/month is not enough money to sufficiently re-invent your house. It would probably take me about 10 years on that budget to get all the furniture and accessories I would need to give my house that "WOW" factor.
Sooooooooo...going forward, I will be beefing up my budget. I am still going to try to keep purchases reasonable. This means Craigslisting and DIYing whenever possible, but I'm not going to feel guilty about spending a little more on a good quality piece. I look forward to sharing all the changes with you. See you in Chattanooga!!

I'm excited at the chance to start over in a new place and redecorate, too. We are officially debt-free now (more on that later), so I feel like I will finally have the opportunity to express myself creatively. It was an interesting experiment, trying to decorate on a budget of $75/month, but I would call it a "fail." I found that the money didn't really stretch that far, and I was limited to purchasing small decorative items.
Sooooooooo...going forward, I will be beefing up my budget. I am still going to try to keep purchases reasonable. This means Craigslisting and DIYing whenever possible, but I'm not going to feel guilty about spending a little more on a good quality piece. I look forward to sharing all the changes with you. See you in Chattanooga!!

Sunday, June 3, 2012
The Evolution of a Blog
I've been making a lot of changes (again) lately. In the course of the last year, I've learned a lot about how to make my blog acurately reflect the vision I've held in my head. I know very little about code, or HTML, and I've been slowly learning how to change the "out of the box" Blogspot template into something I feel really reflects me, and my personal style. There is still so much I'd like to do, but I'm liking the progress we've made so far. Let's take a journey, here's a recap of the changes we made this year...


Header Before:

A good start, but a little too "cartoonish" for me. Our family likes to inject humor in our design, but I don't want it too feel like we're high on laughing gas!
Header in Progress:

A little better. It's simple *check*. Looks kinda fun *check*. And is symbolic of a house-in-progress *check*. But it feels a little too crowded.
Header After:

Perfect! Nothing looks too crowded and it's straightforward. Can you tell I L-O-V-E orange? I think it's my power color.
Background Before:

Whoah nelly!! I like orange, but that's a whole lotta orange overload. And, what is up with those chimney puffs?! They have to go!
Background Progress:
Okay, that's a little better, but still not perfect. Let's try this:

Gross!!!! No way, let's try that again...

Um, this reminds me of a not-so-yummy-looking baby food. No go.
Background After:

This will work. Something that doesn't draw too much attention, but is still visually interesting *check*. Kinda looks like houndstooth fabric, bonus! Haha!
Put it all together and you get...

What I wanted: Something that reflected what we, the Hevels, are like while helping the reader to understand what to expect from our blog. We LOVE color here, and don't like to take ourselves too seriously, but I can't fight my attraction to beautiful things (I think I owe that, in great part, to my Mother faithfully exposing me to the fine arts and culture; thanks Mom!). It's a balance here, because my guys like everything to be practical, simple, no-fuss! My preference would to be surrounded by lovely things. I don't need them to necessarily be practical, they just need to make me feel good. I love the design challenges this provides, even in considering how to design our blog to accurately reflect ALL of us. What I hoped our blog/house would reflect is that we are a creative family, who enjoys a thoughtfully designed and colorful house, while also functioning well to serve the needs of each individual family member. Our design is definitely eclectic, but I hope it would also evoke a peaceful, "come, stay a while and kick your feet up" feeling. I'd love to hear from you, what do you think of our new design?
Let's talk Mood Boards
Lots of my friends have asked me to help them find their design style. There are plenty of good quizes out there that will help you get an idea of what your personal style is (some of my favorites are the HomeGoods style quiz, BHG Color Personality quiz, Sproost personal style quiz, and Stylish Home Style Maker quiz), but nothing compares to actually looking at a collection of pictures that help inspire you to find YOU. The best way to do this is by creating a Mood Board. A place for you to gather all your ideas together, so you can define your own personal style. It can be virtual (on a computer program, a website, or in a digital photo album) like these:
 |
| 1. Digital/Photoshop mood board from Chalk+Dot 2. Online mood board from Olioboard 3. Digital/Photoshop mood board from Little Nudge 4. Photo Album style, interactive iPad/iPhone mood board from Moodboard Pro |
Or they can be physical, like these:
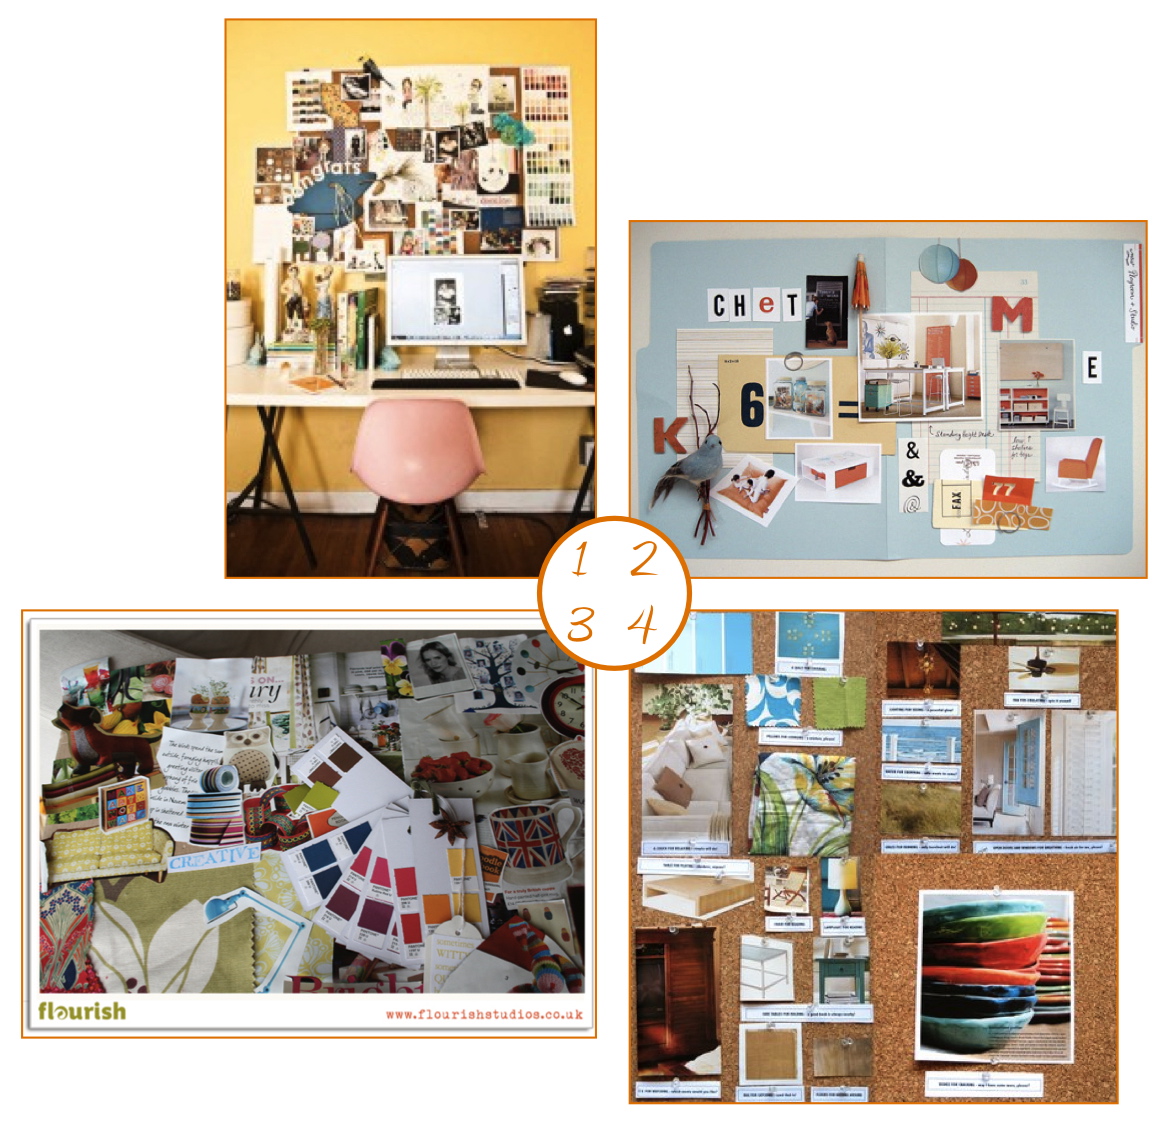 |
| 1. Wall mood board from Sitt 2. File Folder mood board from Coochicoos 3. Collage mood board from Flourish Studios 4. Cork Board from Lorenz Studios |
"Why should I make a mood board?"
A mood board can help you see whether or not your color choices/fabric patterns will work well together, if your furniture is to scale, or if your style is cohesive before you commit to a purchase. It can save you a lot of time and money.
"So how do I make a mood board of my own?"
It's easy! I recommend the following:
- First, set up a Pinterest account. You need to gather all your ideas in one place. Somewhere you can look at all the pictures together to find the similarities. This is an excellent website that will easily facilitate this. I would recommend creating a virtual "Inspiration Board" for each room. When you find a room that you love, Pin It! Don't give this step too much thought. Go with your initial reaction. You can always delete it later. The whole idea here it to just gather as much inspiration as possible. When you get enough rooms together, look at the whole board and ask yourself, "What do they all have in common?" After a while, you will start to see what you "like" and add those elements to your own rooms.
- Find your inspiration. There are LOTS of places where you can find things to Pin. My favorite resources are: Apartment Therapy, HOUZZ, and DecorPad. All of these websites have photos of great, inspirational design and you can even narrow your search down to see specific rooms or styles. They are my "go to" resources.
- Create your personal mood board. The final step in the process is to design your room! Once you have narrowed down your "style", look for items that fit. Cut them out of magazines, use one of the many online resources (such as Pinterest or Olioboard), or take pictures of them in the store and add them to a "Mood Board" photo album (keep a list of the resources so you can find the things later). Whatever you do, make sure they are all in the same place so you can look at them together. Gather as much stuff as you can!! Then, edit the board to make your final design plan. Some things will get the heave-ho and others will stay until you have a mood board that reflects your personal style. Then, go shopping!!
You may find that your personal style will make many transformations, as ours did. In the past year, I've played around with my mood boards. Changing ideas. Creating "new" looks. And just getting a better idea of my own personal design "style." That's the best part about this whole process! You get to "try" without buying, "live" in a room without committing, and finally fall in "love" with your dream room.
Saturday, June 2, 2012
A Little Recap, and An Apology
{Wow, I really am a bad blog Mommy. I wrote this back in December! Egads, better late than never I suppose.}
Soooooo, it looks like I've been a bad blog Mommy.....again. *sigh* Thanks to those of you who have stuck with me. It really has been the craziest 6 months!! I figure I owe you guys an explanation for just abandoning you, so here goes:
In June, my parent's tenants moved out of their rental. We were, of course, recruited to help freshen the place up with a new coat of paint in hopes of getting it ready to rent again. When we arrived, we realized that it was going to take more than a new coat of paint to make this pig look pretty! The walls and floors were torn up, there was dog food and hair everywhere, there was soot all over the walls from a kitchen fire (unbeknownst to us), wall lamps were hanging off the wall with exposed wires, the oven was no longer functioning, and the yard was screaming "GO AWAY!" Since it was summer time (and school was out) we decided to make the trek back and forth to my parent's rental (1 hour each way) several times a week to try to get it ready to rent again.
The goal was to quickly fix and repair everything by August 1st, but as anyone who has worked on old homes can tell you, "nothing goes as planned." We ran into just about every road block imaginable, but the biggest problem was the kitchen. *shudders* Oh how I hate kitchen remodels. (P.S., I give mad props to the folks who make it look so easy a kindergartner could do it, see the Petersiks from Young House Love do it here and the ridiculously adorable and talented Amanda & Ben over at Our Humble A{Bowe}d over here, because I have to admit ours looked more like a comedy of errors than a "how to.")
But for now I leave you with this....I l-o-v-e this commercial.
Who doesn't need their own, personal, interior designer in a closet?!
Wednesday, June 22, 2011
Dreams are Free
Well, I'm back!! I have several more posts upcoming about how exactly I spent my $75 in April & May, but for now I'm just celebrating that I finally cracked the login to sign back into my blog. Yay, me!! ( I will be writing that down so I don't get locked out ever again.) Anyhoo...we've been hard at work here at the HevelHouse & have some big changes coming, I can't wait to share them.
In the meantime, I will update you on our plans for our little "Project." I'm always thinking of new ways we could decorate our home and LOVE doing mood boards. It's like shopping without spending a penny, and it's so much fun to see how many different ways I can decorate one room. It drives Shawn a little crazy sometimes. He's always seeing dollar signs racking up, but I just remind him, "Dreams are free!" The other day, I was looking at our living room mood board and thinking it was getting a little LOUD with all the bright colors.
I love color, but our apartment isn't very big and despite the open floor plan I just don't think I could live long term with so many "in your face" color choices. So back to the (virtual) drawing board I went. In the original plan, I designed the room around a print we purchased in San Francisco from one of my favorite artists. It was Wayne Thiebaud's "Three Machines." I just loved the way the paint seemed to change colors and how vivid it was on the canvas, but filling my entire house with those colors was like a sugar overload!
I was aiming for "fun & funky", but searching for fabrics & accessories to match the poster print made it seem more like "loud & crazy." The colors in the Thiebaud print were very limiting, and everything I found looked like it had just come out of a child's toy box! See what I mean?...
I quickly decided that my beloved Thiebaud print would have to go. So for the living room re-design I picked our current living room/dining/kitchen paint colors as a starting point. I knew I wanted something that was similar to my original design, but with a more sophisticated, grown-up feel. Without the pressure of having to match-up my fabric to anything, I could pick something that I loved (something that I could live with for more than just the 30 seconds it takes to hang them up) and then choose accessories that would compliment the fabric. I finally settled on this print:
I loved the movement of the pattern and how playful it was while still seeming to stay sophisticated. Once I decided on the anchor fabric, the rest of the process moved a little faster. I hit up my favorite spots for pillows, accessories, and furniture and LOVED how it all turned out!
In the meantime, I will update you on our plans for our little "Project." I'm always thinking of new ways we could decorate our home and LOVE doing mood boards. It's like shopping without spending a penny, and it's so much fun to see how many different ways I can decorate one room. It drives Shawn a little crazy sometimes. He's always seeing dollar signs racking up, but I just remind him, "Dreams are free!" The other day, I was looking at our living room mood board and thinking it was getting a little LOUD with all the bright colors.
LIVING ROOM BEFORE
 |
| 1. Green Jute Roman Shade, World Market 2. DIY Starburst Mirror 3. Paint: Sagey/Jogging Path/Yarrow, Sherwin Williams 4. Waterfall Acrylic Table, ebay 5. Thom Filicia "Fabia" in Spa, Calico Corners 6. Pier One pillow 7. Arabesque Rug, World Market 8. Teal painted piano, DIY 9. "Three Machines" Poster, Wayne Theibaud 10. Manstad Sleeper Sofa, IKEA 11. DIY Tripod Surveyer's lamp |
I love color, but our apartment isn't very big and despite the open floor plan I just don't think I could live long term with so many "in your face" color choices. So back to the (virtual) drawing board I went. In the original plan, I designed the room around a print we purchased in San Francisco from one of my favorite artists. It was Wayne Thiebaud's "Three Machines." I just loved the way the paint seemed to change colors and how vivid it was on the canvas, but filling my entire house with those colors was like a sugar overload!
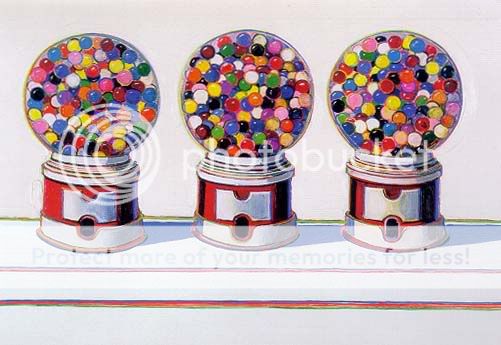 |
| Wayne Thiebaud's, Three Machines |
 |
| Ralph Lauren, Carolina Paisley via JoAnn Fabric |
 |
| Waverly, Wonderama (Toucan) |
LIVING ROOM AFTER
 |
| 1. Green Jute Roman Shade, World Market 2. DIY Starburst Mirror 3. Waverly "Wonderama", Fabric.com & Diamante "Seamist", Calico Corners 4. DIY Tripod Surveyer's Lamp 5. Acrylic Waterfall Coffee Table, eBay 6. Flokati Wool Rug, World Market 7. CB2 Pillows (discontinued) 8. Manstad Sleeper Sofa, IKEA 9. DIY Painted Piano 10. Mug Shot Pet Portrait, Manda's Art Studio 11. Paint: Jogging Path/Sagey/Yarrow, Sherwin Williams |
I learned two lessons through this process:
- If it's not working, change it - Don't get too hung up on any one piece. I love my poster print, but it just wasn't working for me. If something you love isn't working for your design plan, give yourself permission to get rid of it.
- Start with the fabric - It's always easier, when designing a room, to start with a fabric you love; then pick the paint and accessories to match.
Monday, April 11, 2011
Best Laid Plans
What I planned to do this weekend was take "before" photos of my whole house to give you a better idea of what I'm working with, but then Shawn & I got called away to do this....

A bathroom rescue for a client; complete with scraping, sanding, spackling, & sealing. What was supposed to be a simple, "I'll just throw a fresh coat of paint on the walls before my daughter's Birthday party" turned into an S.O.S. of epic proportions (nothing like the sight of blistering, peeling paint to send you running for the professionals). So instead, I will leave you with a very simple Before & After.
When we first moved into our apartment I decided it was best to wait before I hung any artwork on the wall. I wanted to get a feel of the space and dreaded the idea of turning my walls into Swiss cheese from moving pictures around. That brings us to today's "before". There is this tiny little wall in the kitchen that I felt has been begging for SOMETHING, but what? I wanted to find a super cool vintage frame and fill it with cork to make a family message station, kind of like this:
The reality is, I have absolutely NO time to take on yet another project (and should probably focus on finishing the ones I already started) so the wall has looked more like this for the past year:

Such a waste of space!! While helping the hubby organize the garage I rediscovered my boxed-up paintings and pictures. I had almost forgotten that I had all those wonderful treasures hiding right under my nose. One of the paintings incorporated all the colors from my kitchen & dining room and would tie the two rooms together nicely while filling the space out perfectly! I had purchased this piece from a local artist when we lived at our last house and never could find "the perfect place" for it, so I carefully boxed it up until I could find one. The artist called it "Affluence", but something about it made the man look so sad to me.

I love how he's dressed well but is missing his shoes, like it was all a facade of wealth. It brings to mind the phrase, "keeping up appearances." Anyways, I digress. *ahem* So I dragged it out from the garage and put the hubby to work (he's very handy like that). Perfection!!

It's amazing to me how such a small change can make a big impact. On a larger wall, this painting would have gotten lost, but the scale fits perfectly and allows the painting to command attention. Best of all? This makeover was F-R-E-E (quite possibly one of my favorite words)!! Maybe you have something hiding away in your attic/garage that can breath new life into a neglected space in your house.
Side Note:
I'm a big fan of supporting local artists. "Affluence" was painted by a young artist name Leroy Shaw who is a self-taught artist. I especially like his more expressionist works. You can check out some of his work on his MySpace page, or if you are in Columbia you can catch him at the Barnyard.

A bathroom rescue for a client; complete with scraping, sanding, spackling, & sealing. What was supposed to be a simple, "I'll just throw a fresh coat of paint on the walls before my daughter's Birthday party" turned into an S.O.S. of epic proportions (nothing like the sight of blistering, peeling paint to send you running for the professionals). So instead, I will leave you with a very simple Before & After.
When we first moved into our apartment I decided it was best to wait before I hung any artwork on the wall. I wanted to get a feel of the space and dreaded the idea of turning my walls into Swiss cheese from moving pictures around. That brings us to today's "before". There is this tiny little wall in the kitchen that I felt has been begging for SOMETHING, but what? I wanted to find a super cool vintage frame and fill it with cork to make a family message station, kind of like this:
 |
| House and Home |
The reality is, I have absolutely NO time to take on yet another project (and should probably focus on finishing the ones I already started) so the wall has looked more like this for the past year:

Such a waste of space!! While helping the hubby organize the garage I rediscovered my boxed-up paintings and pictures. I had almost forgotten that I had all those wonderful treasures hiding right under my nose. One of the paintings incorporated all the colors from my kitchen & dining room and would tie the two rooms together nicely while filling the space out perfectly! I had purchased this piece from a local artist when we lived at our last house and never could find "the perfect place" for it, so I carefully boxed it up until I could find one. The artist called it "Affluence", but something about it made the man look so sad to me.

I love how he's dressed well but is missing his shoes, like it was all a facade of wealth. It brings to mind the phrase, "keeping up appearances." Anyways, I digress. *ahem* So I dragged it out from the garage and put the hubby to work (he's very handy like that). Perfection!!

Side Note:
I'm a big fan of supporting local artists. "Affluence" was painted by a young artist name Leroy Shaw who is a self-taught artist. I especially like his more expressionist works. You can check out some of his work on his MySpace page, or if you are in Columbia you can catch him at the Barnyard.
 |
| Self-Portrait, Leroy Shaw |
Subscribe to:
Posts (Atom)